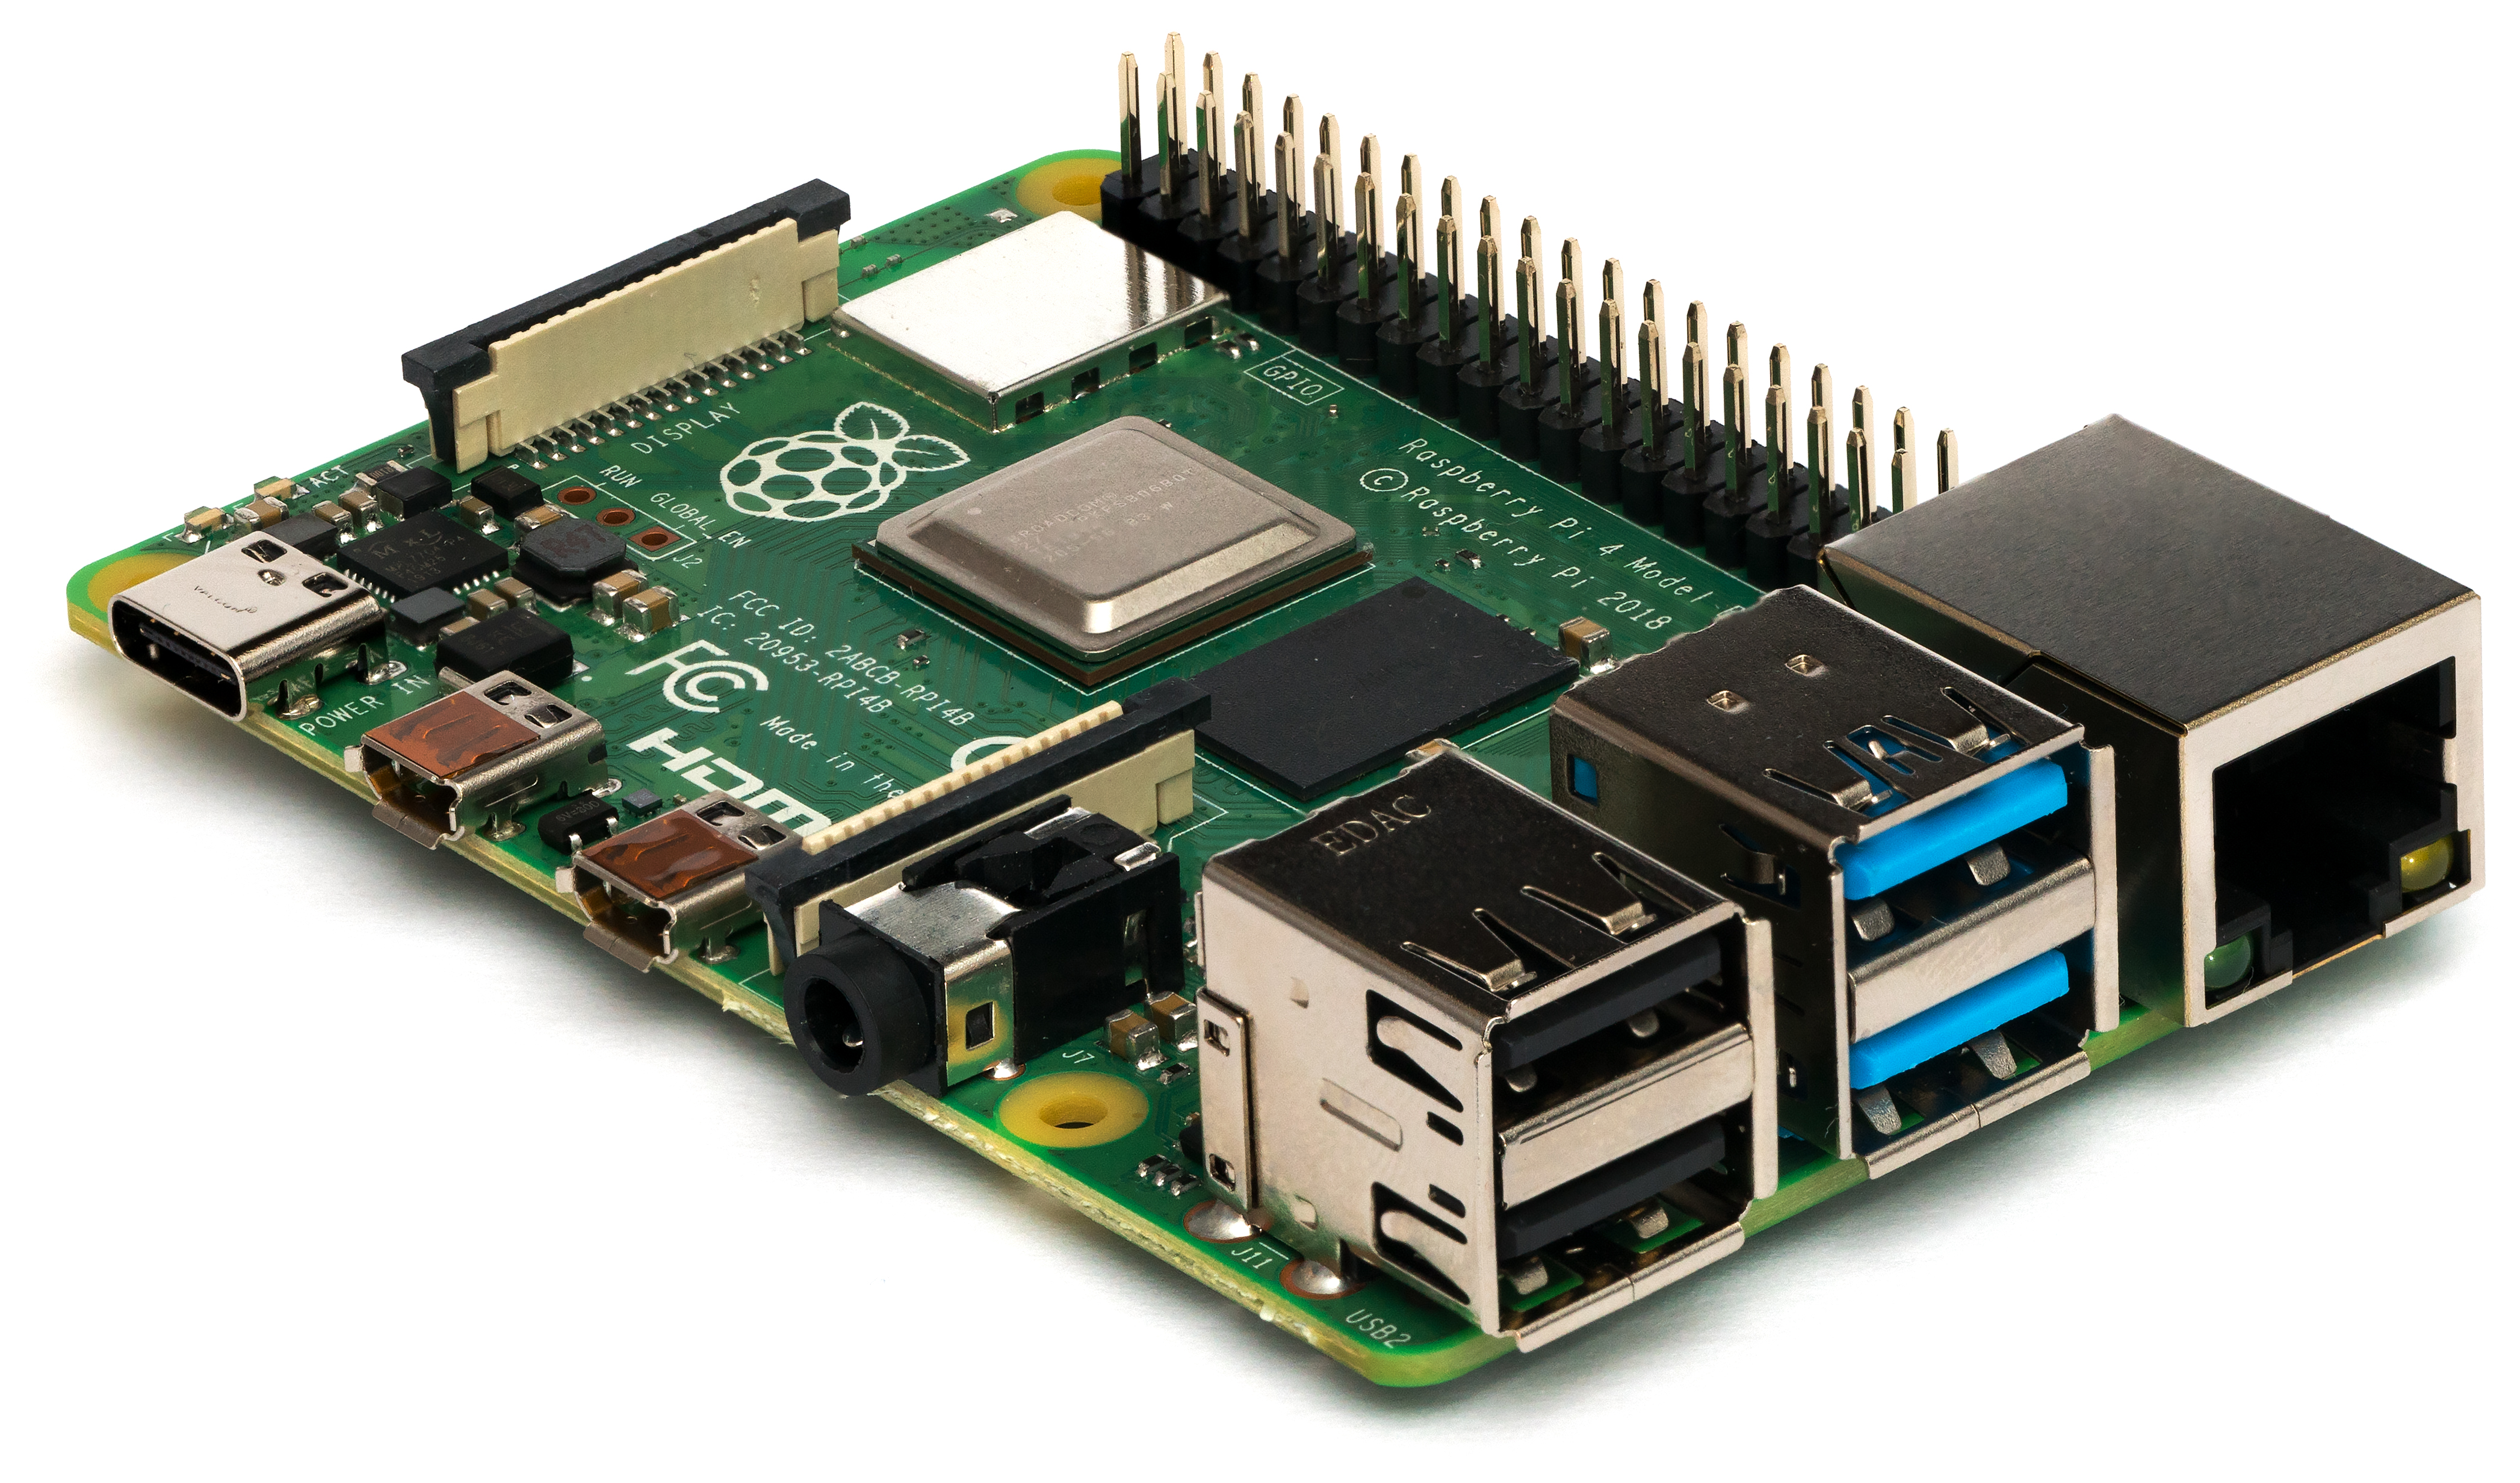
After exploring Rust for smaller bare-metal systems like Cortex-M based microcontrollers, I am trying to learn using Rust when using a Linux runtime. The most common example for this is the Raspberry Pi, but there are a lot of other boards out there which support Embedded Linux, for example the Beagle Bone Black or Xilinx hybrid CPU / FPGA solutions like the Zynq 7020.
I am especially interested in the potential of Rust to develop more complex applications and allow remote development on Linux boards. All of this generally requires cross-compiling. For most use-cases and simpler projects, compiling and running the applications on the Linux boards directly is a lot simpler then the effort of setting up a cross-compiling environment on a host machine.
Some Background Information
If you’re only interested in the result and on how to quickly cross-develop applications for your Linux board, go to the next section.
My experiences when developing something like satellite software for an Embedded Linux Software are the following:
- Even though there is a Linux runtime, it might not support compiling applications on the board directly. For example, the Q7S used in one of our projects has a root file system limit of 32 MB, so it does not even contain something like header files.
- There is generally one monolithic software written in C or C++ and which contains all the application logic. It contains most of the dependencies, for example on libraries for a certain device like a Star Tracker. This means the compilation times are long. Even if the Linux boards support compilation, compiling the primary software on the board becomes unfeasable.
- There are only 1-2 of the On-Board Computers available. For example, one is a Flight Model which remains packaged until satellite asembly while the other one is the Engineering Model which has to stay in the clean room. Allowing convenient development requires remote deployment of the application. Otherwise, one would have to go into the cleanroom for every small test or change to the software.
- The software is complex and debugging can become complex too. Printouts and LEDs are not sufficient anymore to debug the software, a full debugger is required additionally.
For that reason, convenient cross-compilation and debugging are very important for me when considering Rust as an alternative to C/C++ on systems like the Q7S. I have only found bits and pieces in the Internet on how to properly do these tasks. Therefore, I have created a template repository which gathers all those bits and pieces into one package. I specifically targeted debugging with the command line and with VS Code as those tools are most commonly used in Rust development from what I have seen so far. The instrutions provided here have been tested on Linux (Ubuntu 21.04) and Windows 10, but I really recommend to use a Linux development hosted when developing anything for an Embedded Linux board.
Cross-Building a Rust application for the Raspberry Pi
The instructions here are based on this excellent guide.
Clone the template repository first:
git clone https://github.com/robamu-org/rpi-rs-crosscompile.git
You can also use the template functionality of GitHub to create your own custom repository. Cross-Building an application for the Raspberry Pi still requires a C/C++ cross-toolchain to compile Rust with an ARM linker. Make sure to download a suitable cross-compiler. Most of the automation performed by the repository is done in a Python script, so it is recommended to install Python as well.
Make sure you can call it from the command line
Linux:
[Raspberry Pi 4] rmueller@power-pinguin:~/Rust/rpi-rs-crosscompile(main)$ python3 --version
Python 3.9.7
Windows:
Robin@DESKTOP-7KSTH01 MSYS ~/Documents/Rust/rpi-rs-crosscompile (main)
$ py --version
Python 3.9.0
You need to install scp and ssh for the Python script to work. There are different ways to
do this, for example by installing Puttty or by installing these tools with MinGW64.
Setting up the Raspberry Pi
There are different ways to avoid having to retype the password everytime
when tranferring an application to the Raspberry Pi or running an application
remotely. On Linux, you can use sshpass for this.
The most easiest way and the one I recommend is to install your SSH key
on the Raspberry Pi with ssh-copy-id. This works on Linux and Windows.
You can follow the steps specified here to do this.
Another way is to use a SSH key file by supplying the -f SSHFILE flag
to the bld-deploy-remote.py application in your .cargo/config.toml
or as an environmental variable SSHPASS with the -e flag.
Setup Linux
You can create a cross-compiler built with crosstool-ng from here. There is one available for the Raspberry Pi 3 and the Raspberry Pi 4.
Following command should get the job done, assuming you
installed the cross-compiler shown above into the $HOME/x-tools folder:
export PATH=$PATH:"$HOME/x-tools/armv8-rpi4-linux-gnueabihf/bin"
You can also put this in a script named rpi4-path.sh and source it
with . rpi4-path.sh or your can put it in your .bashrc file to add it
to $PATH permanently.
Test with armv8-rpi4-linux-gnueabihf-gcc --version:
[Raspberry Pi 4] rmueller@power-pinguin:~/Rust$ armv8-rpi4-linux-gnueabihf-gcc --version
armv8-rpi4-linux-gnueabihf-gcc (crosstool-NG 1.24.0.390_62e9db2) 8.5.0
Copyright (C) 2018 Free Software Foundation, Inc.
This is free software; see the source for copying conditions.  There is NO
warranty; not even for MERCHANTABILITY or FITNESS FOR A PARTICULAR PURPOSE.
Proceed with the generic setup.
Setup Windows
It is recommended to install the cross-toolchain provided by SysProgs.
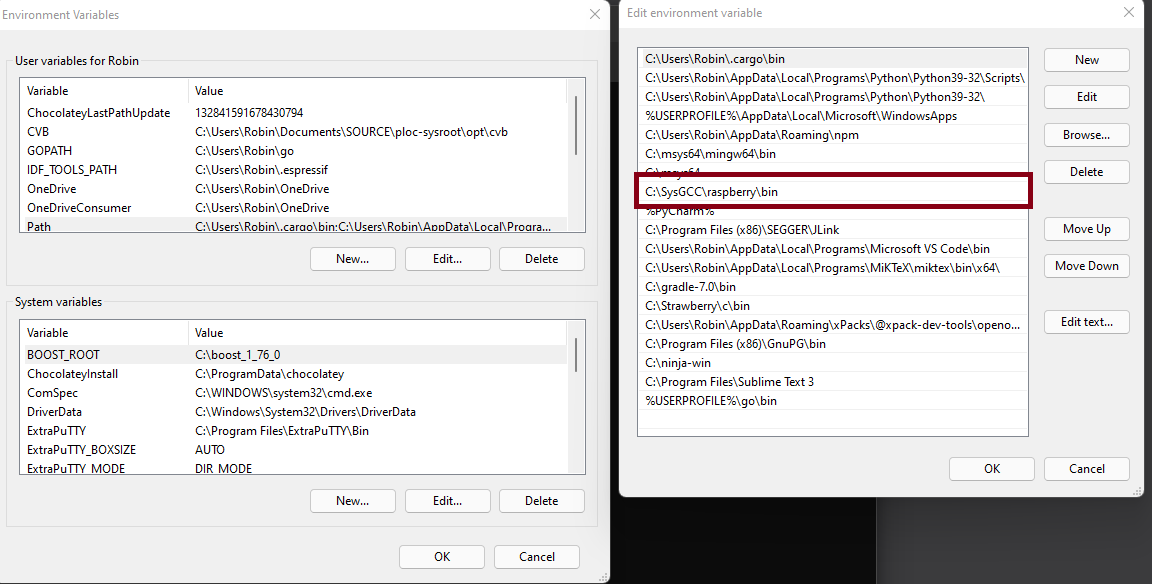
Add the binary path of your installed cross-toolchain for your path.
You can add the toolchain binary path to your system environmental variables permanently, for example like shown here:
If you use git bash, you can also use the Linux way shown above.
Test with arm-linux-gnueabihf-gcc --version:
C:\Users\Robin\Documents\Rust\rpi-rs-crosscompile [main ≡]> arm-linux-gnueabihf-gcc --version
arm-linux-gnueabihf-gcc.exe (Raspbian 8.3.0-6+rpi1) 8.3.0
Copyright (C) 2018 Free Software Foundation, Inc.
This is free software; see the source for copying conditions.  There is NO
warranty; not even for MERCHANTABILITY or FITNESS FOR A PARTICULAR PURPOSE.
Proceed with the generic setup.
Generic Setup
Now you are ready to build the first application for the Raspberry Pi.
The .cargo/def-config.toml file is a template for a Cargo configuration
to perform flashing conveniently. Copy it to .cargo/config.toml first:
cd .cargo
cp def-config.toml config.toml
Then open the config.toml with a text editor of your choice and select
the correct linker first, for example with armv8-rpi4-linux-gnueabihf-gcc on Linux or
arm-linux-gnueabihf-gcc on Windows:
# If you use a different cross-compiler, adapt this flag accordingly.
# linker = "armv8-rpi4-linux-gnueabihf-gcc"
# linker = "arm-linux-gnueabihf-gcc"
# linker = "arm-none-linux-gnueabihf-gcc"
Then select the correct runner to run the application instead of debugging it. For Windows,
select a runner using py.
Linux:
# Requires Python3 installation. Takes care of transferring and running the application
# to the Raspberry Pi
# runner = "py bld-deploy-remote.py -t -r --source"
runner = "python3 bld-deploy-remote.py -t -r --source"
...
# runner = "py bld-deploy-remote.py -t -d --source"
# runner = "python3 bld-deploy-remote.py -t -d --source"
...
# runner = "py bld-deploy-remote.py -t -d -s --gdb arm-linux-gnueabihf-gdb --source"
# runner = "python3 bld-deploy-remote.py -t -d --source"
Windows:
# Requires Python3 installation. Takes care of transferring and running the application
# to the Raspberry Pi
runner = "py bld-deploy-remote.py -t -r --source"
# runner = "python3 bld-deploy-remote.py -t -r --source"
...
# runner = "py bld-deploy-remote.py -t -d --source"
# runner = "python3 bld-deploy-remote.py -t -d --source"
...
# runner = "py bld-deploy-remote.py -t -d -s --gdb arm-linux-gnueabihf-gdb --source"
# runner = "python3 bld-deploy-remote.py -t -d --source"
Finally select the correct builder depending on whether you have a Raspberry Pi 0/1 or a Raspberry Pi 2/3/4
Building the application
Everything should be ready to build the application.
Simply use cargo build.
Running the application
Everything should be ready to run the application remotely now.
Running the application is very simple now: Use cargo run, which will also build the application
automatically:
Linux:
[Raspberry Pi 4] rmueller@power-pinguin:~/Rust/rpi-rs-crosscompile(main)$ cargo run
    Finished dev [unoptimized + debuginfo] target(s) in 0.00s
     Running `python3 bld-deploy-remote.py -t -r --source target/armv7-unknown-linux-gnueabihf/debug/rpi-rs-crosscompile`
Running transfer command: sshpass  scp target/armv7-unknown-linux-gnueabihf/debug/rpi-rs-crosscompile pi@raspberrypi.local:"/tmp/rpi-rs-crosscompile"
Running target application: sshpass  ssh pi@raspberrypi.local /tmp/rpi-rs-crosscompile
 __________________________
< Hello fellow Rustaceans! >
 --------------------------
        \
         \
            _~^~^~_
        \) /  o o  \ (/
          '_   -   _'
          / '-----' \
Windows:
C:\Users\Robin\Documents\Rust\rpi-rs-crosscompile [main ≡]> cargo run
    Finished dev [unoptimized + debuginfo] target(s) in 0.01s
     Running `python3 bld-deploy-remote.py -t -r --source target\armv7-unknown-linux-gnueabihf\debug\rpi-rs-crosscompile`
Running transfer command:  scp target\armv7-unknown-linux-gnueabihf\debug\rpi-rs-crosscompile pi@raspberrypi.local:"/tmp/rpi-rs-crosscompile"
Warning: Permanently added the ED25519 host key for IP address '...' to the list of known hosts.
rpi-rs-crosscompile                                                                   100% 4448KB  10.2MB/s   00:00
Running target application:  ssh pi@raspberrypi.local /tmp/rpi-rs-crosscompile
Warning: Permanently added the ED25519 host key for IP address '...' to the list of known hosts.
 __________________________
< Hello fellow Rustaceans! >
 --------------------------
        \
         \
            _~^~^~_
        \) /  o o  \ (/
          '_   -   _'
          / '-----' \
As you can see, all commands executed by the Python scripts are shown as well.
Debugging the application on the Command Line
You can switch to the debugging configuration by changing the runner accordingly
Linux:
# Requires Python3 installation. Takes care of transferring and running the application
# to the Raspberry Pi
# runner = "py bld-deploy-remote.py -t -r --source"
# runner = "python3 bld-deploy-remote.py -t -r --source"
...
# runner = "py bld-deploy-remote.py -t -d --source"
# runner = "python3 bld-deploy-remote.py -t -d --source"
...
# runner = "py bld-deploy-remote.py -t -d -s --gdb arm-linux-gnueabihf-gdb --source"
runner = "python3 bld-deploy-remote.py -t -d --source"
Console output:
[Raspberry Pi 4] rmueller@power-pinguin:~/Rust/rpi-rs-crosscompile(main)$ cargo run
    Finished dev [unoptimized + debuginfo] target(s) in 0.00s
     Running `python3 bld-deploy-remote.py -t -d -s --source target/armv7-unknown-linux-gnueabihf/debug/rpi-rs-crosscompile`
Running transfer command: sshpass  scp target/armv7-unknown-linux-gnueabihf/debug/rpi-rs-crosscompile pi@raspberrypi.local:"/tmp/rpi-rs-crosscompile"
Running debug command: sshpass  ssh -f -L 17777:localhost:17777 pi@raspberrypi.local "sh -c 'killall -q gdbserver; gdbserver *:17777 /tmp/rpi-rs-crosscompile'"
Process /tmp/rpi-rs-crosscompile created; pid = 7343
Listening on port 17777
Running start command: gdb-multiarch -q -x gdb.gdb target/armv7-unknown-linux-gnueabihf/debug/rpi-rs-crosscompile
Reading symbols from target/armv7-unknown-linux-gnueabihf/debug/rpi-rs-crosscompile...
warning: Missing auto-load script at offset 0 in section .debug_gdb_scripts
of file /home/rmueller/Rust/rpi-rs-crosscompile/target/armv7-unknown-linux-gnueabihf/debug/rpi-rs-crosscompile.
Use `info auto-load python-scripts [REGEXP]` to list them.
Remote debugging from host 127.0.0.1
Reading /lib/ld-linux-armhf.so.3 from remote target...
warning: File transfers from remote targets can be slow. Use "set sysroot" to access files locally instead.
Reading /lib/ld-linux-armhf.so.3 from remote target...
...
0xb6fcea30 in ?? () from target:/lib/ld-linux-armhf.so.3
Breakpoint 1 at 0x40ce70: main. (2 locations)
Reading /usr/lib/arm-linux-gnueabihf/libarmmem-v7l.so from remote target...
...

Breakpoint 1, 0x0040cf48 in main ()
(gdb) c
Continuing.

Breakpoint 1, rpi_rs_crosscompile::main () at src/main.rs:5
5       let out = b"Hello fellow Rustaceans!";
(gdb) c
Continuing.
 __________________________
< Hello fellow Rustaceans! >
 --------------------------
        \
         \
            _~^~^~_
        \) /  o o  \ (/
          '_   -   _'
          / '-----' \

Child exited with status 0
[Inferior 1 (process 7343) exited normally]
(gdb)
Windows:
# Requires Python3 installation. Takes care of transferring and running the application
# to the Raspberry Pi
runner = "py bld-deploy-remote.py -t -r --source"
# runner = "python3 bld-deploy-remote.py -t -r --source"
...
# runner = "py bld-deploy-remote.py -t -d --source"
# runner = "python3 bld-deploy-remote.py -t -d --source"
...
runner = "py bld-deploy-remote.py -t -d -s --gdb arm-linux-gnueabihf-gdb --source"
# runner = "python3 bld-deploy-remote.py -t -d --source"
Now, you can use cargo run like before, but this time the Python helper program will
start a GDB server on the Pi and then launch a GDB application locally to debug the program.
Console Output, using git bash here with scp and ssh installed via MinGW64:
Robin@DESKTOP-7KSTH01 MSYS ~/Documents/Rust/rpi-rs-crosscompile (main)
$ cargo run
    Finished dev [unoptimized + debuginfo] target(s) in 0.01s
     Running `py bld-deploy-remote.py -t -d -s --gdb arm-linux-gnueabihf-gdb --source 'target\armv7-unknown-linux-gnueabihf\debug\rpi-rs-crosscompile'`
Running transfer command:  scp target\armv7-unknown-linux-gnueabihf\debug\rpi-rs-crosscompile pi@raspberrypi.local:"/tmp/rpi-rs-crosscompile"
Enter passphrase for key '/c/Users/Robin/.ssh/id_rsa':
target\armv7-unknown-linux-gnueabihf\debug\rpi-rs-crosscompile                        100% 4448KB   5.4MB/s   00:00
Running debug command:  ssh -f -L 17777:localhost:17777 pi@raspberrypi.local "sh -c 'killall -q gdbserver; gdbserver *:17777 /tmp/rpi-rs-crosscompile'"
Enter passphrase for key '/c/Users/Robin/.ssh/id_rsa':
Process /tmp/rpi-rs-crosscompile created; pid = 29621
Listening on port 17777
Running start command: arm-linux-gnueabihf-gdb -q -x gdb.gdb target\armv7-unknown-linux-gnueabihf\debug\rpi-rs-crosscompile
Reading symbols from target\armv7-unknown-linux-gnueabihf\debug\rpi-rs-crosscompile...done.
warning: Unsupported auto-load script at offset 0 in section .debug_gdb_scripts
of file C:\Users\Robin\Documents\Rust\rpi-rs-crosscompile\target\armv7-unknown-linux-gnueabihf\debug\rpi-rs-crosscompile.
Use `info auto-load python-scripts [REGEXP]` to list them.
Remote debugging from host 127.0.0.1
0xb6fcea30 in ?? () from c:\sysgcc\raspberry\arm-linux-gnueabihf\sysroot/lib/ld-linux-armhf.so.3
Breakpoint 1 at 0x40a7e4

Breakpoint 1, 0x0040a7e4 in main ()
(gdb) b 6
Breakpoint 2 at 0x40a718: file src\main.rs, line 6.
(gdb) c
Continuing.

Breakpoint 2, rpi_rs_crosscompile::main () at src\main.rs:6
6           let width = 24;
(gdb) s
8           let mut writer = BufWriter::new(stdout());
(gdb) c
Continuing.
 __________________________
< Hello fellow Rustaceans! >
 --------------------------
        \
         \
            _~^~^~_
        \) /  o o  \ (/
          '_   -   _'
          / '-----' \

Child exited with status 0
[Inferior 1 (process 29621) exited normally]
(gdb)
Debugging the application with VS Code and CodeLLDB
I think the best debugging experience is still provided by GUI tools like Eclipse or VS Code. The following examples are shown for Linux. The second one should work for Windows as well, but I had issues getting the first configuration to work on Windows.
GDB server started by VS Code
Unfortunately, I have not found a way to get the debug output produced by an application when starting the GDB server with VS code. Feel free to investigate how this could be solved using VS Code tasks.
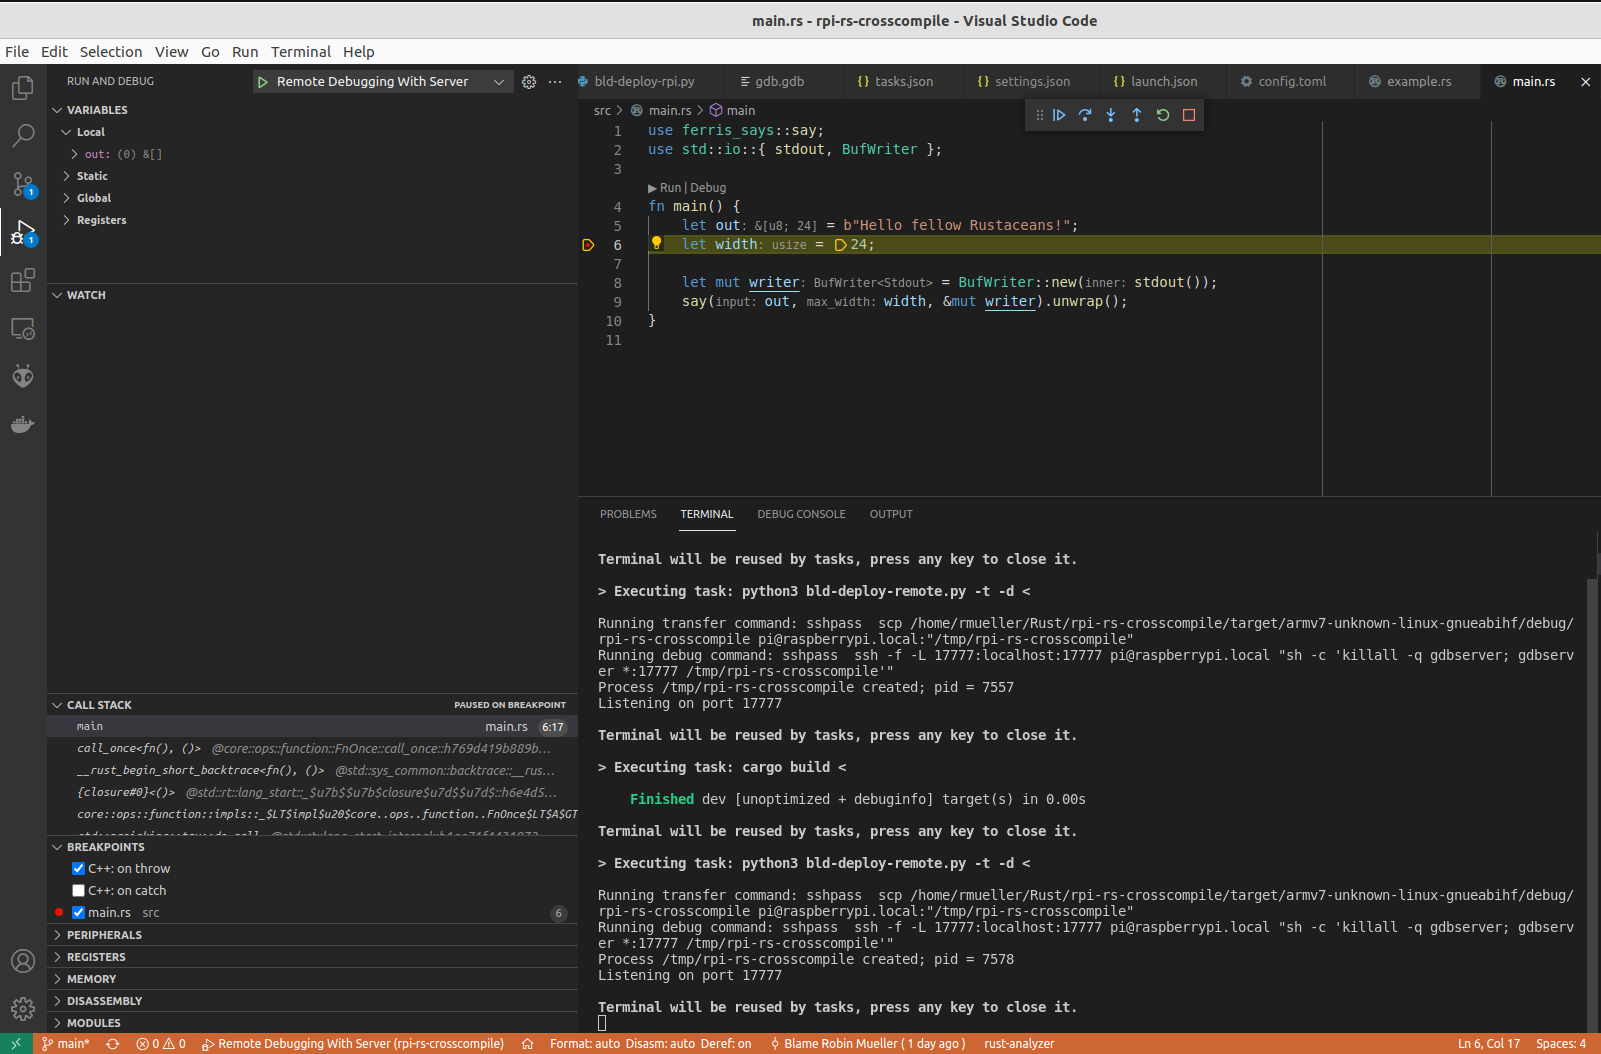
You can simply select and run the Remote Debugging With Server configuration
in VS Code. The result should look something like the following:
GDB server started externally
The only difference is that the GDB server is now started in an external shell
instance, which also allows to see debug output produced by the application.
Configuring .cargo/config.toml correctly allows simply using cargo run to start the GDB server:
# Requires Python3 installation. Takes care of transferring and running the application
# to the Raspberry Pi
# runner = "py bld-deploy-remote.py -t -r --source"
# runner = "python3 bld-deploy-remote.py -t -r --source"
...
# runner = "py bld-deploy-remote.py -t -d --source"
runner = "python3 bld-deploy-remote.py -t -d --source"
...
# runner = "py bld-deploy-remote.py -t -d -s --gdb arm-linux-gnueabihf-gdb --source"
# runner = "python3 bld-deploy-remote.py -t -d --source"
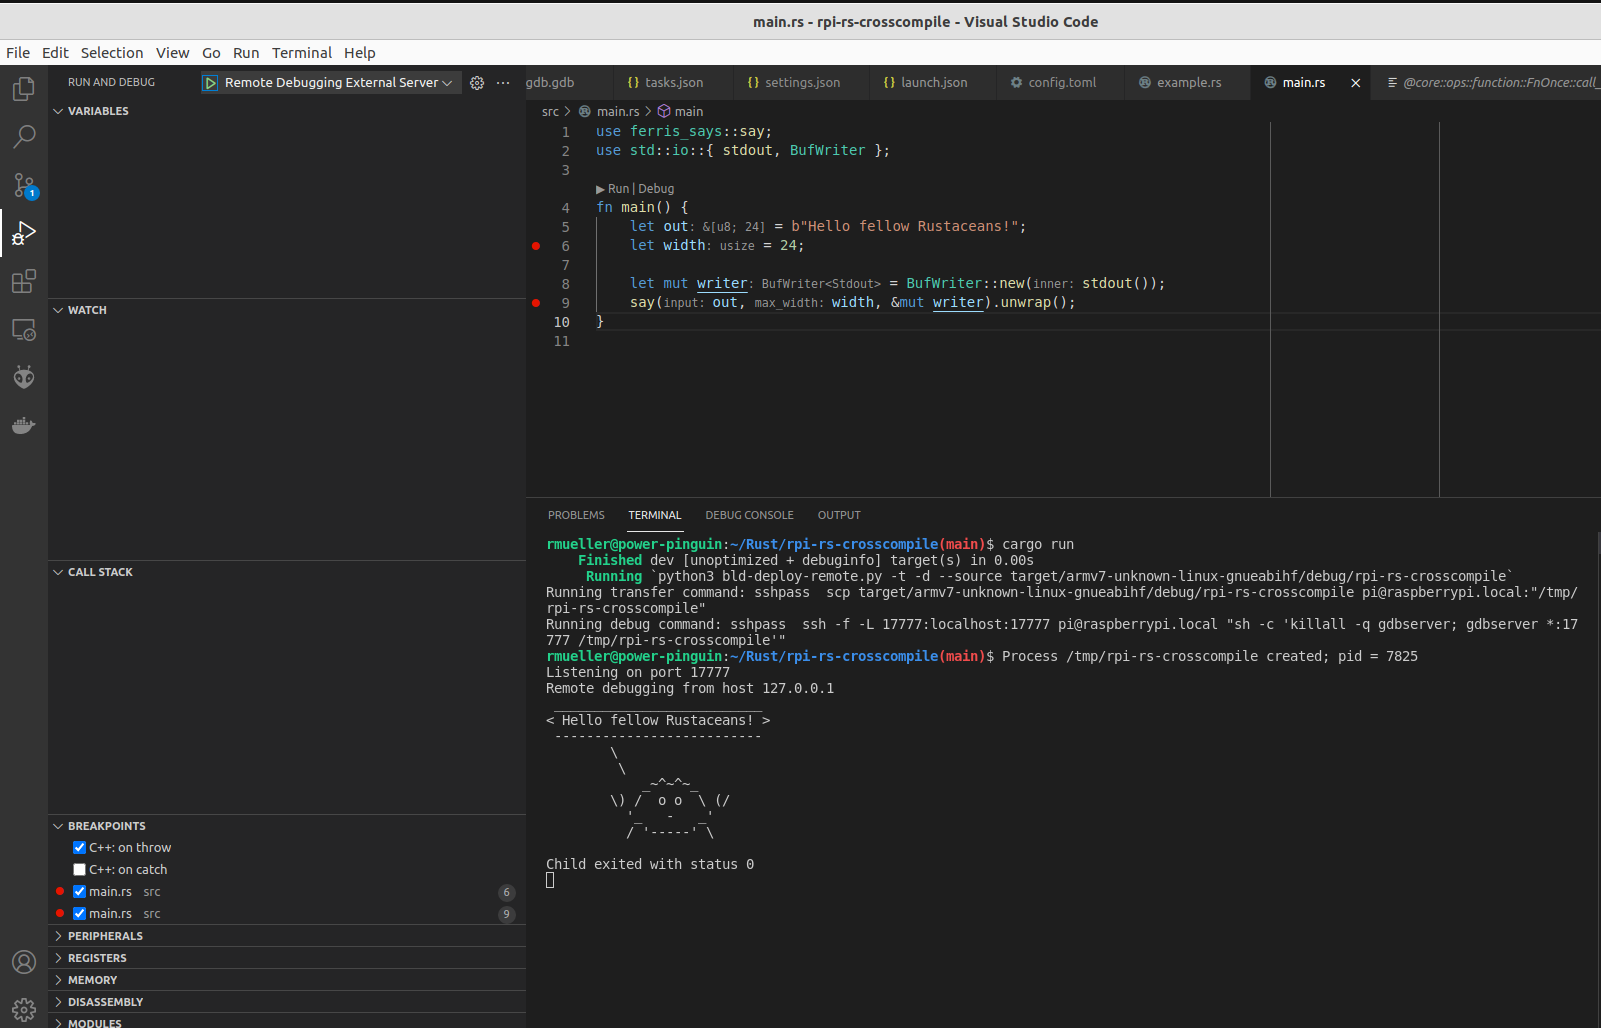
After using cargo run, you can run the Remote Debugging External Server
configuration in VS Code. The result should look something like the following:
Under the hood
If you’re interested how exactly this is done in VS Code, you can have a look at the
launch.json
and tasks.json
provided in the template repository.
These generally call the bld-deploy-remote.py script, which can be found
here.
This script automates one to all of the following steps which are generally required to deploy and
debug a cross-compiled application:
- Build the application. When using a Cargo runner, Cargo will take care of this step
- Transfer the application to the Raspberry Pi using the
-tflag. The default destination is the/tmpfolder, but this can be customized with the--destflag - Start the
gdbserveron the Raspberry Pi. The script also sets up port forwarding on the port 17777 so that the development host can simply connect tolocalhost:17777 - Start the GDB application to debug the software
Using Python instead of a shell script to perform these steps provides a little bit more flexiblity and portability in my opinion. It also makes it easier to adapt the script to custom requirements, because Python has the most easiest and most readable syntax of all automation tools I have worked with.
This script can also be easily ported to other Embedded Linux board by tweaking the
DEFAULT_* parameters found at the top of the Python script.
Room for Improvements
I have not really looked into how tools like cross
could be used to simplify this process. I think some steps might become easier but using cross
also requires docker. I think the ways to run and deploy cross-compiled software shown here
are sufficient for most use-cases. I might try out cross in the future though.


