Multi-tasking exercise and IPC
In this exercise, you will learn how to do pre-emptive multi-tasking with embassy. You will also learn some basic ways to do communication between tasks, which is commonly called inter-process communication (IPC).
Multi-tasking on embedded systems
Most non-trivial embedded applications have to perform multiple tasks at once. Some of these tasks might have real-time constraints which means that the tasks need to be performed within a certain time frame.
You could write a super loop firmware, where a custom state machine takes care of performing all tasks at once. However, this quickly gets unwieldy as the number of tasks grows. Furthermore, it is error-prone when trying to fulfill real-time constraints because a CPU intensive task in your state machine could violate those constraints.
In the C/C++ world, you would use a real-time operating system instead, which will always include some way to schedule tasks which run concurrently. Concurrency is the general term of performing multi-tasking on a computing system. It also works on single-core systems by letting a scheduler switch between multiple tasks quickly.
There is a distinction between scheduling types:
- Pre-emptive scheduling - This type is more suitable for real-time requirements. Tasks can have priorities. If a higher-priority task needs work to be done, it will pre-empt a lower priority task to ensure the task gets done as quickly as possible. Pre-emption means that the scheduler will switch from the low priority tasks to the high priority task to service it as quickly as possible.
- Cooperative scheduling - Each task will run until completion or until the work is done. After that, the task will yield to the operating system, which means ceding control to the scheduler so it can start running other (higher-priority) tasks. This means that a low priority task could stop another high priority task from being executed in time.
Interrupts are a special case here. On Cortex-M MCUs like the one we have on the micro:bit, there is a distinction between thread mode and interrupt mode. Thread mode is the default mode where the CPU executes your regular code. Interrupt mode is used when an interrupt occurs and the CPU executes an interrupt handler. An interrupt will always pre-empt the thread mode and can be treated like a pre-emptive task as well.
The default embassy executor runs all async tasks in cooperative mode. You need to cede control
in your async tasks by using await somewhere or a task might monopolize all the CPU time. This
makes it harder to ensure your system meets real-time requirements. Moreover, a task with a bug could
monopolize all the CPU time
and stop other tasks from running. Doing this is a bug on a pre-emptive system as well, but the
consequences are more direct on a system like this. You could use interrupts to allow fulfilling real-time
requirements on important tasks. However, for technical reasons, interrupt handlers must
be regular synchronous functions. Is it possible to have pre-emptive tasks while still being
able to use async? embassy provides the InterruptExecutor
feature as the answer.
You can still have your regular async tasks, but they will now be scheduled by the interrupt mode
of the processor. The processor also allows assigning priorities to an interrupt handler, which
means that all the tasks scheduled by a certain interrupt handler inherit that handler’s priority.
Step 1 - Create a second task
Open the firmware/exercises/src/bin/multitasking_ipc.rs file.
In this task, we have provided a mini board support package (BSP) for you which provides a LED strip
driver for you.
The following line:
#![allow(unused)]
fn main() {
let mut board = bsp::Microbit::default();
}
calls the embassy-nrf initializer function, but only packages the relevant peripheral set into a
Microbit structure. A BSP is usually the correct place to provide board specific abstractions,
so the Microbit structure contains a SimpleLedMatrix object which can be used to
retrieve a LED line driver object, which is done here for you:
#![allow(unused)]
fn main() {
    let mut line_strip = board
        .display
        .line_strip(0)
        .expect("line strip 0 should exist");
}
The first step is to create a second task which prints something when the left user button (A) is pressed. We actually provided a component that you can use for this. The InputChannel can be used to listen for events on GPIO input channels, which includes voltage transitions on those channels which occur when the button is pressed.
It is really simple to add a new task in embassy: Create a new async fn <task_name>()
and annotate it with the embassy_executor::task
attribute. You can even pass input arguments to the function, but you can not use lifetimes or
generics on the task function itself.
A task also needs to be spawned so the executor will schedule and run it. You can use the
spawner for this
which is passed as an input argument to your main method. You need to pass the call of your new
async task to the spawn
method for this to work.
Declaration of the new task:
#![allow(unused)]
fn main() {
#[embassy_executor::task]
async fn new_task() {
    loop {
        defmt::info!("my new task");
        embassy::time::Timer::after(Duration::from_secs(1)).await;
    }
}
}
and somewhere in your main function:
#![allow(unused)]
fn main() {
spawner.spawn(new_task().expect("spawning task failed"));
}
The expect or unwrap is okay here. The only case where spawning a function may fail is when
you are spawning multiple instances of the same task.
Now we want to actually check for edges (voltage transitions) on the GPIO input connected to the
button. For this, you need to pass the button_left_async driver object we provided for you
to the task. The type of this driver is gpiote::InputChannel<'static>. You can transfer this
driver to the task by declaring it as an input argument to your new task.
#![allow(unused)]
fn main() {
async fn left_button_task(left_button: gpiote::InputChannel<'static>) {
    loop {
        defmt::info!("my new task");
        embassy::time::Timer::after(Duration::from_secs(1)).await;
    }
}
}
and in your main:
#![allow(unused)]
fn main() {
spawner.spawn(new_task(button_left_async).expect("spawning task failed"));
}
Debouncing a GPIO line
Before we talk about how you can check for button presses in software, we need to talk a bit about some things that can happen on the GPIO digital line when you press the button.
A button is implemented as a mechanical switch. When you press the button, you are actually closing the contacts of a circuit. You can have a look at how this is wired up in the following image extracted from the schematic:
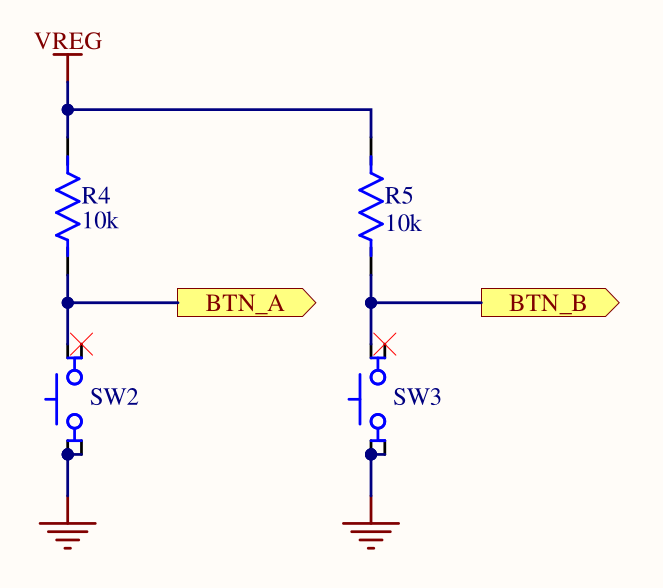
This is a really common way to connect a button to an input pin using a pull-up resistor. The Wikipedia link provides some more information, but we will provide a simplified explanation here: Without the connection of the input pin to the supply voltage through a resistor, you would have a floating pin without a determined state when the switch is open. The pull-up resistor pulls the voltage on the pin up to the supply voltage when the switch is open (button is not pressed), so you will measure a digital high when reading the input pin. When the switch is closed (button pressed), you have a voltage divider, where all the voltage drops across the pull-up resistor. Consequently, you will read a digital low when reading the input pin.
The problem with mechanical switches is that they can bounce, which means that you might see fluctuations on the digital line when you press the button. The following image provides a nice visualization:
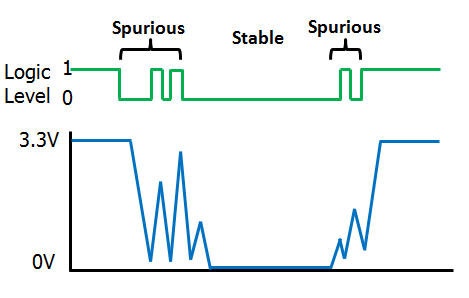
These bounces can make the measurement of edges imprecise. You might measure multiple edge events in software even when you only press the button once. To avoid this, you can debounce the button. A really simple way to do this would be to perform the following sequence:
- Wait for a high-to-low edge to occur
- Wait for a small delay, for example 10 to 20 milliseconds
- Wait for a low-to-high edge to occur. This might already be the case.
- Wait for a small delay, for example 10 to 20 milliseconds
- Go back to step 1.
Usually, you want to do something when you detect a button press. You can do this between step 3 and 4 or after step 4.
Detecting edges on a GPIO line
You should have all the information you need now. The InputChannel driver provides an
async wait_for_high
and wait_for_low
method. Use these functions and implement a debounced button press detection.
#![allow(unused)]
fn main() {
#[embassy_executor::task]
async fn left_button_task(mut button_a: gpiote::InputChannel<'static>) {
    loop {
        button_a.wait_for_low().await;
        // Debounce the button.
        embassy_time::Timer::after(Duration::from_millis(20)).await;
        button_a.wait_for_high().await;
        // Debounce the button.
        embassy_time::Timer::after(Duration::from_millis(20)).await;
        defmt::info!("The left button was pressed");
    }
}
}
When you have implemented this, test this by flashing the app using cargo run --bin multitasking_ipc --release,
pressing the left button and observing the program output.
Intermediate solution file:
firmware/exercises/src/bin/multitasking_ipc_step1.rs
Step 2 - Third task scheduled by an interrupt scheduler
Now, we want to run a third task which is responsible for doing the same process for the right button, but we actually want to run it with a higher priority. We are going to use the interrupt scheduler for this. You can declare the task similarly to how you declared the second task. The only thing that changes when using another scheduler is how the task is spawned.
Add the declaration of the third task which does the same logic, but for the right button
right_button_async.
#![allow(unused)]
fn main() {
#[embassy_executor::task]
async fn right_button_task(mut button_b: gpiote::InputChannel<'static>) {
    loop {
        button_b.wait_for_low().await;
        // Debounce the button.
        embassy_time::Timer::after(Duration::from_millis(20)).await;
        button_b.wait_for_high().await;
        // Debounce the button.
        embassy_time::Timer::after(Duration::from_millis(20)).await;
        defmt::info!("The right button was pressed");
    }
}
}
We mentioned that you can use the InterruptExecutor
provided by embassy. You have to activate support for it with a feature, but we already did this for
you for the embassy-executor dependency. If you look at the API of the executor, you can see
that its methods are only available for instances with a 'static lifetime. This means
that you have to create the executor as a global static. This is necessary anyway so you can
use it inside an interrupt handler.
Create a static variable INTERRUPT_EXECUTOR as a global. If you are not sure how the syntax
of this works: You can declare a static variable by using static <VAR_NAME>: <VarType> = <Construction/Instantiation>
In this case, the constructor is a call of the new method of the executor.
#![allow(unused)]
fn main() {
static INTERRUPT_EXECUTOR: embassy_executor::InterruptExecutor = embassy_executor::InterruptExecutor::new();
}
Now, you can use start method of the executor to start it. You need to assign an interrupt by
passing an Interrupt enum variant
to the method. The start method will pend the interrupt, causing it to fire immediately. It will also return
a spawner object that you can use to assign tasks to that executor.
You can use any interrupt normally dedicated for a hardware unit that we are not using, for example
the QDEC variant.
Some CPU architectures offer dedicated software interrupts, but this one does not.
Call the start method in your main routine and store the spawner inside a interrupt_exec_spawner
object. Use the QDEC interrupt variant as the input argument. Do not run the code just yet!
Inside your main method:
#![allow(unused)]
fn main() {
let interrupt_exec_spawner = INTERRUPT_EXECUTOR.start(embassy_nrf::interrupt::Interrupt::QDEC);
}
You also need to declare an interrupt handler. If you did not do that, a default handler which is
an empty loop would be executed. Inside the interrupt handler, you need to call the on_interrupt method
of the interrupt executor. The cortex-m-rt run-time library takes care of exposing a mechanism
which allows us to declare interrupt handlers. You have to use the following import statement
to get access to the interrupt macro:
#![allow(unused)]
fn main() {
use embassy_nrf::interrupt;
}
Then, you can annotate a regular function with that exact macro. The function must have
the exact name of the enum variant we showed you earlier, in our case QDEC.
So this would look like:
#![allow(unused)]
fn main() {
use embassy_nrf::interrupt;

#[interrupt]
fn QDEC() {
    // Interrupt handler code here.
}
}
The special property of this function is that it is not called by software regularly. Instead, this function is called by the hardware when the QDEC interrupt fires. Normally, it would be used to service the QDEC peripheral, but we are using it to run our interrupt scheduler now instead.
Call the interrupt executor on_interrupt method inside the interrupt handler. It is an unsafe
method because calling it has safety constraints that the compiler can not prove. In this
case, we can fulfill the constraints by only calling this function once in the correct
interrupt handler. It is good practice to document your unsafe code blocks with a // Safety:
note, so you should do that as well.
#![allow(unused)]
fn main() {
use embassy_nrf::interrupt;

#[interrupt]
fn QDEC() {
    // Safety: We only call this once inside the interrupt handler.
    unsafe {
        INTERRUPT_EXECUTOR.on_interrupt();
    }
}
}
Finally, you can use the interrupt_exec_spawner object inside your main method to spawn the third
task that you created.
Inside your main method:
#![allow(unused)]
fn main() {
let interrupt_exec_spawner = INTERRUPT_EXECUTOR.start(embassy_nrf::interrupt::Interrupt::QDEC);
interrupt_exec_spawner.spawn(right_button_task(button_right_async)).expect("spawning task failed");
}
Now verify that everything is working by running the application, pressing the right button (B) and observing the program output.
Intermediate solution file:
firmware/exercises/src/bin/multitasking_ipc_step2.rs
Step 3 - Signalling our main application
One common task in complex applications is the communication between concurrent tasks. This
is called inter-process communication (IPC). The embassy framework provides the
embassy-sync library which
is an embedded and async friendly IPC library. We are going to use this library to facilitate
communication between the main task and the button tasks.
The Signal
object provides a simple signalling mechanism which can be used to allow one task to notify
another one. In this case, your task will be to use this mechanism to notify the main task
about the button press. In the main task, you should listen to the signalling mechanism
and switch between two modes: An On mode where the LED is toggled periodically, and an Off
mode where it is off. You can create some enumeration to model these states, or you can just
use a boolean.
The signal mechanism is shared between tasks. The intended way to share it is to create
a static instance of it which can be used by both tasks. You can have a look at the
Signal example code.
Notice the first generic argument, which is a CriticalSectionRawMutex in this case. The
Signal abstraction takes care of synchronization internally to avoid data races, and allows
configuring the lock mechanism for that. In our case, we can use a cheaper synchronization
mechanism by using the ThreadModeRawMutex
instead. It is valid to use this lock because we are on a single-core system and both of our tasks
are regular cooperative tasks running in thread-mode.
Create a static instance called SIGNAL_LEFT_BUTTON. The signal mechanism also allows
specifying some signal type as the second generic argument, which can be sent during a notification.
In this case, there is no additional information required, so a unit value () can be used.
#![allow(unused)]
fn main() {
static SIGNAL_LEFT_BUTTON: Signal<ThreadModeRawMutex, ()> = Signal::new();
}
All the API on signal
only requires a shared reference, and you can use the signal, wait and try_take function to
signal from the button task and wait in the main task respectively.
In your task which waits for button A presses, add a call to the signal function after detecting
a button press.
#![allow(unused)]
fn main() {
#[embassy_executor::task]
async fn left_button_task(mut button_a: gpiote::InputChannel<'static>) {
    loop {
        button_a.wait_for_low().await;
        // Debounce the button.
        embassy_time::Timer::after(Duration::from_millis(20)).await;
        button_a.wait_for_high().await;
        // Debounce the button.
        embassy_time::Timer::after(Duration::from_millis(20)).await;
        SIGNAL_LEFT_BUTTON.signal(());
        defmt::info!("The left button was pressed");
    }
}
}
Intermediate solution file:
firmware/exercises/src/bin/multitasking_ipc_step3.rs
Step 4 - Using the signal in the main task
In the main task, you also have the issue that you have to perform two tasks now: Handling the
blinking of the first task periodically while also doing the same for the second LED in combination
with checking the signal state. You could fix this with an additional task, but then you would have
to add some lock mechanism to share the LED strip across both tasks. Asynchronous Rust
also allows an alternative way to perform multiple tasks in the same async task.
The select API
allows polling two asynchronous tasks in the same loop. We have already imported the required
embassy-futures API for you. Concerning the application logic, it is usually still best
from a readability standpoint to have distinct async functions which perform their specialized
task. You can wrap the LedStrip driver in a core::cell::RefCell
and then pass a shared reference to that structure to each async function to share the driver
safely across multiple async functions. This is valid because the async functions are all
part of the same async task, so there is no way for one async function to pre-empt another,
which could cause multiple borrows of the driver. We are going to take care of creating
these async functions first.
Extract the existing task which toggles the top left LED into a distinct async task called
main_led_task first. Pass a shared reference to RefCell<LedStrip<'a>> to it. Also note that
the limitation that you are not allowed to use lifetimes only applies to async tasks
annotated by the embassy_executor::task macro.
You have to update the main task and call borrow_mut on the wrapper driver object to actually
retrieve and toggle the LED in the task now.
async fn main_led_task<'a>(led_strip: &RefCell<LedStrip<'a>>) {
    loop {
        led_strip.borrow_mut().toggle(0);
        Timer::after(Duration::from_millis(500)).await;
    }
}
We will now create the new async task for toggling the left LED and implementing the target logic.
We actually need two states now: A TOGGLING state and an OFF state, which is toggled when we are
signalled by the button task.
Create a boolean or an enumeration for modelling the state now. We recommend an explicit state
enumeration: It is more readable and allows easier extension. It makes sense to add a toggle
implementation to the enumeration as well for an even more readable API.
#![allow(unused)]
fn main() {
#[derive(Debug, Clone, Copy)]
pub enum BlinkState {
    Toggling,
    Off,
}

impl BlinkState {
    pub fn toggle(&mut self) {
        *self = match self {
            BlinkState::Toggling => BlinkState::Off,
            BlinkState::Off => BlinkState::Toggling,
        }
    }
}
}
Now create the second async task. Pass in the driver similarly to how you did it in the main LED
task. Create a new instance of your state variable and initialize it to the logical OFF state.
Start with a simple implementation which toggles the LED every 250 milliseconds if
the blink state is in the TOGGLING state.
#![allow(unused)]
fn main() {
async fn left_led_task<'a>(led_strip: &RefCell<LedStrip<'a>>) {
    let blink_state = BlinkState::Off;
    loop {
        if blink_state == BlinkState::Toggling {
            led_strip.borrow_mut().toggle(1);
        }
        Timer::after(Duration::from_millis(250)).await;
    }
}
}
Now, you actually need to add the logic to wait for a signal from the button task while also
performing the periodic waiting. You can use the same select API you used earlier to select
between two asynchronous tasks and stop on the first one which is resolved to completion.
In this case, you can select between the timer elapsing after 250 ms and the wait call
on the signal. Implement and use it in your task like explained. Calling the select method
creates a new future which you can await. It will return the Either
object which notifies you which async event was resolved to completion.
Change your left blinky async function and call the select API to wait on both
the periodic delay and the wait method of the signal, whichever finishes first. Match on the
awaited select call.
In the branch for the periodic delay, toggle the LED if you are in the TOGGLING state.
In the branch for the signal handling, toggle the blink state variable. It makes sense to
also turn the LED off when going to the OFF state.
#![allow(unused)]
fn main() {
async fn left_blinky<'a>(led_strip: &RefCell<LedStrip<'a>>) {
    let mut blink_state = BlinkState::Off;
    loop {
        match embassy_futures::select::select(
            SIGNAL_LEFT_BUTTON.wait(),
            Timer::after(Duration::from_millis(250)),
        )
        .await
        {
            embassy_futures::select::Either::First(_) => {
                blink_state.toggle();
                if let BlinkState::Off = blink_state {
                    led_strip.borrow_mut().off(1);
                }
            }
            embassy_futures::select::Either::Second(_) => {
                if let BlinkState::Toggling = blink_state {
                    led_strip.borrow_mut().toggle(1);
                }
            }
        }
    }
}
}
Now, all that is left to do is to execute both the left_blinky and the main_led_task
inside your main task. As already mentioned, you can also use the select API for this, but
you do not need to match on the output of the select call. Instead, you can poll both of these
async tasks in a permanent loop.
At the end of your main task:
#![allow(unused)]
fn main() {
    let line_strip_shared = core::cell::RefCell::new(line_strip);
    loop {
        embassy_futures::select::select(
            main_led_task(&line_strip_shared),
            left_blinky(&line_strip_shared),
        )
        .await;
    }
}
You can now test this using cargo run --bin multitasking_ipc --release.
Intermediate solution file:
firmware/exercises/src/bin/multitasking_ipc_step4.rs
Step 5 - Send a message from the third task on a button press
We now want to teach another common IPC mechanism: Message queues. The embassy Channel
provides a static and typed message with async support. We are going to use this channel
to send information from the right button task to the main task.
We want to measure the amount of time the button was pressed in the button task and send that
duration to the main task. Then we can blink the button with that updated frequency.
Similarly to the channel abstractions offered by the Rust standard library, most channel libraries
targeting embedded systems offer some way to be split up into a sender and receiver driver object.
The sender
and receiver
allow this.
Similarly to the Signal object we used earlier, one of the easiest ways to share this channel
is to declare it as a global static object. Moreover, the lock object M required to avoid data
races needs to be specified again. This time, we can not use the ThreadModeRawMutex because the
sender is scheduled inside an interrupt handler and not in thread-mode. The
CriticalSectionRawMutex is the correct lock now. You also have to specify the size of the queue
statically as the N generic.
Create a static CHANNEL_RIGHT_BUTTON instance using the
embassy_sync::channel::Channel<CriticalSectionRawMutex, embassy_time::Duration, 4> type.
Above your main:
#![allow(unused)]
fn main() {
static CHANNEL_RIGHT_BUTTON: embassy_sync::channel::Channel<
    CriticalSectionRawMutex,
    embassy_time::Duration,
    4,
> = embassy_sync::channel::Channel::new();
}
The next step is to measure the duration of the button press. It is very easy to measure
durations using embassy_time because it offers abstractions similar to the standard library.
You can retrieve an embassy_time::Duration for the difference between two time points by
subtracting one embassy Instant
from another:
#![allow(unused)]
fn main() {
let start = embassy_time::Instant::now();
// Some operation which takes time
// (...)
// `elapsed` has the `embassy_time::Duration` type.
let elapsed = embassy_time::Instant::now() - start;
}
Use this to measure the button press duration in your right button task. Then use the
CHANNEL_RIGHT_BUTTON sender method to retrieve a sender handle and use its send method
to send the duration to the main task. The send method is an async function that needs
to be awaited.
#![allow(unused)]
fn main() {
#[embassy_executor::task]
async fn right_button_task(mut button_b: gpiote::InputChannel<'static>) {
    loop {
        button_b.wait_for_low().await;
        let now = embassy_time::Instant::now();
        // Debounce the button.
        embassy_time::Timer::after(Duration::from_millis(20)).await;
        button_b.wait_for_high().await;
        let elapsed = embassy_time::Instant::now() - now;
        // Debounce the button.
        embassy_time::Timer::after(Duration::from_millis(20)).await;

        CHANNEL_RIGHT_BUTTON.sender().send(elapsed).await;
        defmt::info!("The right button was pressed");
    }
}
}
Intermediate solution file:
firmware/exercises/src/bin/multitasking_ipc_step5.rs
Step 6 - Handle blinky duration messages in main task
As the final step, process the received messages by using the receiver method of
CHANNEL_RIGHT_BUTTON and its receive method to receive the messages from the right button
task. You need a state variable to track the current blink frequency which is then updated
by the messages. You can start with a periodic frequency of 1000 milliseconds.
One way to cleanly do this is to extract this into a dedicated async function similarly to how
it was done for handling the signal of the left button task.
embassy-futures offers methods like select3 to allow selecting between more than 2 tasks.
Right blinky task:
#![allow(unused)]
fn main() {
async fn right_blinky<'a>(led_strip: &RefCell<LedStrip<'a>>) {
    let mut blink_freq = Duration::from_millis(1000);
    loop {
        match embassy_futures::select::select(
            CHANNEL_RIGHT_BUTTON.receiver().receive(),
            Timer::after(blink_freq),
        )
        .await
        {
            embassy_futures::select::Either::First(new_duration) => {
                defmt::info!("New blink frequency: {:?} ms", new_duration.as_millis());
                blink_freq = new_duration;
            }
            embassy_futures::select::Either::Second(_) => {
                led_strip.borrow_mut().toggle(2);
            }
        }
    }
}
}
main loop:
#![allow(unused)]
fn main() {
    let line_strip_shared = core::cell::RefCell::new(line_strip);
    loop {
        embassy_futures::select::select3(
            main_led_task(&line_strip_shared),
            left_blinky(&line_strip_shared),
            right_blinky(&line_strip_shared),
        )
        .await;
    }
}
Full reference solution file:
firmware/exercises/src/bin/multitasking_ipc_solution.rs
Finishing Up
Run cargo run --bin multitasking_ipc --release and try pressing the right button down for different
times. You should see the blink frequency change depending on how long you pressed the button.
You might have noticed that there are actually multiple ways to specify tasks. You can either
use async functions annotated with #[embassy_executor::task] or you use methods like
join or select provided by the embassy-futures
crate. Which one is actually better? The embassy book provides some notes on this.
Generally, each separate task will require its own (static) RAM allocation, but using select or
join might require a little bit of more CPU time juggling futures.
The general recommendation is to use the easier solution because there is no large difference.
In our case, it made sense to handle the LED strip driver in one task because it is relatively
easy to share resources across async functions safely using RefCell and Cell.
You also saw the two primary schedulers that you can use in embassy. If you have deadlines
on a task or need priorities on tasks, you can use the InterruptScheduler for this.
There are a lot more abstractions inside the embassy-sync crate that you might find useful.
For example, you can use the Pipe
structure for byte-oriented data like the one received on a UART peripheral.
You also specified an interrupt handler using the interrupt macro provided by cortex-m-rt and
re-exported by the HAL. Interrupt handlers actually do not allow input arguments for technical
reasons. How do you share data with them when you actually need to or want to write your own?
Unfortunately, the only way here is to use global shared data. Considering that most interrupt
handlers have the primary purpose to service hardware peripherals, it is okay to also
instantiate low level device drivers for the assigned peripheral that interrupt handler serves
directly without any sharing or lock mechanism. Most PACs and HALs will provide that API. Then, you
can combine it with the data structures provided
by embassy-sync or with lock objects like the embassy Mutex
or the critical-section Mutex
to safely share or send data to your regular software tasks. Most async APIs for hardware drivers
rely on interrupt handlers to function properly. Luckily, most modern HALs offer
interrupt handlers with explicit support for async. embassy even goes one step further and
provides a convenient bind_interrupts! macro which declares this function for you so you can not
forget to do this.